Gina's Designs lasercut chipboard company is looking for talented, motivated, responsible designers who have time to commit to creating projects each month with our products and promoting our products online and at their local stores. We haven't set a specific number of designers for our team; we will determine the membership total based on the number of applicants.
To apply, please do the following:
1. E-mail Gina at dtcall@ginasdesigns.net with the subject line: Gina's Designs DT Call
2. Attach 3 projects showcasing your work. These can be projects you have already done or new ones. We would like to see a variety whether it be cards, layouts, altered items, etc. These projects do NOT need to include Gina's Designs products.
3. Include links to your blog (required) and any online galleries where you upload your projects.
4. Tell us why you think you would be a perfect fit for Gina's Designs design team and what your favorite technique is when using die-cuts. Please provide a little information about yourself, where you are located, what inspires you when creating, your personal crafty style, and your arts and crafts background
.
** This design team call is open to everyone and will close on June 15, 2014. New DT members will be notified via email no later than June 17, 2014 and the DT term will begin on July 1, 2014.
Selected Designers will receive:
*A Design Team Package Quarterly (every 3 months)
*Your name and picture linked to your blog from Gina's Designs Blog
*Gina's Designs badge to feature on your blog
*40% discount on all Gina's Designs Products
*Bonus given to those who are published in a printed crafting publication (Gina's Designs must be listed in the supply list for your project)
What we expect:
*Create a minimum of 4 projects per month
A project consists of:
1 Mini Album
1 layout
1 altered item
2+ cards
Set of 3+ ATCs
Set of 6+ twinchies
Off the Page Project
Or any other item preapproved by Gina's Designs
*Must have a personal active blog (posting at least once a week)
*Must display Gina's Designs badge with link to Gina's Designs website on your blog
*Upload all projects to:
A. at least 1 online gallery such as Splitcoaststampers, Spotted Canary, Scrapbook.com or another gallery approved by Gina's Designs
B. at least 1 social networking site (ning site, Pinterest, etc)
C. your blog
*Must use Skype and be available for one meeting per month
*Must participate in blog hops and challenges sponsored by Gina's Designs
*Must participate in cross promotional activities between Gina's Designs and other companies
*Specially assigned projects become the property of Gina's Designs and finished project must be mailed back to Gina's Designs.
*Full usage rights of all photos and videos of projects are assigned to Gina's Designs.
*All team members will be asked to watermark their project photos with the Gina's Designs logo and your name/URL. This will help us better market our products and your projects on Pinterest as well as other galleries.
*Create at least one tutorial using Gina's Designs products during your term of membership. Tutorial may be in video or written format. These tutorials become the property of Gina's Designs and will be available for free download at http://www.ginasdesigns.net/ Tutorials may be a technique or a project.
*You may be a member of up to three (3) other design teams, but you may not be on a design team for another laser/chipboard company.
*Design Team membership term is 6 months. You may reapply for another term if you are interested.
*Gina's Designs reserves the right to dismiss any design team member who is late on two project release dates (unless prior arrangement or emergency circumstances exist), fails to attend meetings or communicate with coordinator, or for any other situation that places Gina's Designs in a problematic situation.
Wednesday, May 21, 2014


Thursday, March 27, 2014
Gina's Designs DT Project: Lace Banner
Hi everyone. Today I have designed a "lace" sign from Gina's Designs LOVE wall art kit! I plan on using it in my craft room to mark my lace area. When I have decided were that area will be, I will then make the decision on how I will attach it. For now I will just stand it up according style!

I lined the back chipboard with paper from Prima's Delight after edging it with Walnut Stain. The corrugated squares were light touched with gesso. For the letters, I took the "O" and cut a small section from it to make a "C". After a coat of gesso and embossing with Madonna Robe Blue Gold, I turned the "V" upside down and attached the little piece left over to form the "A."


The cutouts are from the paper line. I use a croched doily from my stash under the "A" and one of Gina's Designs under the "E".

The panels were attached together with a lovely piece of lace from CraftSupply1. I took out the ribbon that was woven through it. I then used one of my Tim Holtz Blending Tools and used it to drag the lace over the Antique Linen ink pad.

Below are the before and after pictures of the blue and the flatter-brown flowers from CraftSupplies1.


For the blue flowers above, I simply applied a light coat of gesso to them.

The top flowers (as well as the flowers on the "C" and "A") all started out looking like the flower on the bottom. I first used gesso on them and then Placed around. the one on the left has Lindy's Stamp Gang embossing powder on it . The flower on the right has a little Lindy's scattered on it and then the stampin up! clear embossing powder over the entire flower. The one in the middle was inked and then embossed with clear. This gives another way to color them besides using alcohol inks.

Thanks for stopping by my blog today!!!
Gina's Designs Products
LOVE Wall Art Kit
Cardstock Doily Set Intricate
CraftSupplies1
SHOP HERE
Other Products
Paper: Prima - Delight
Embossing Powder: Lindy's Stamp Gang - Madonna Robe Blue Gold
Stampin' up! - Clear
Ink: Tim Holtz Distress Inks - Walnut Stain, Sage Green, Antique Linen and Pine Needles
Gesso: Studio 71 - white
Flower Buds and Leaves: Wild Orchid Crafts
Doily: Stash
Flat back Pearls and Bling: Stash
Butterflies with Bling: nail art.
LOVE Wall Art Kit
Cardstock Doily Set Intricate
CraftSupplies1
SHOP HERE
Other Products
Paper: Prima - Delight
Embossing Powder: Lindy's Stamp Gang - Madonna Robe Blue Gold
Stampin' up! - Clear
Ink: Tim Holtz Distress Inks - Walnut Stain, Sage Green, Antique Linen and Pine Needles
Gesso: Studio 71 - white
Flower Buds and Leaves: Wild Orchid Crafts
Doily: Stash
Flat back Pearls and Bling: Stash
Butterflies with Bling: nail art.
Thursday, March 13, 2014
Gina's Designs DT Project: Trim Organizer/Cross Promotions with CraftSupplies1
Welcome to my blog today everyone. I have my first cross promotion project for the month for you featuring CraftSupplies1! After putting this one organizer together, I realized I was going to need MANY more! You get a great box with 12 cards to wrap your choice of trim around. The box is very easy to put together. I used Aleene's Tacky Glue to assemble it. Once the glue was dry, I used gesso on the entire box and on the cards. The box (inside and out) and the cards are trimmed with the KellerKurtz & Company paper stack. Have I mentioned that I am in love with this stack? :) I used Mod Podge to adhere the paper to the box. This paper is a bit on the thin side so I did have some wrinkles that did not come out of the paper. I used that to my advantage and went with a vintage look. I took my Walnut Stain ink pad directly to the paper on the box and buffed off the excess.

The wide piece of lace from my stash was attached first followed by a gorgeous Venice heart lace from CraftSupplies1.

The heart trim
comes in a bright white and as you can tell, it can be colored! I use a
combination of the Tea Dye Refill Ink watered down and coffee.

The filigree heart is part of the Filigree Frames Shape Set
available at Gina's Designs. I used Magic Moon Pearls on the outside heart first followed by Orbit Olive Gold on the filigree. The inside of the heart was first inked with Sage Green followed by embossing with Clear from Stampin' Up. I used my script stamp over the top while the embossing was still hot. All
the fabulous flowers are from Craftsupplies1. I did spray some of them with my Tea Dye water mixture.The road metal filigree circles are also available from CraftSupplies1.

The upper edges of the box were lined with pearl trim - another fun product available from CraftSupplies1.
As
you can see, I have decided to use this box for my laces (okay some of
my laces).


After I cut out paper to line both sides of each card, I mod-podged (yes I am using a proper noun as a verb!) them down. Once dried, I distressed the cards with a file (not an easy task to try and rough up the heavy chip!) and Walnut Stain. As you can see in the picture above, I tore off some of the paper in various spots and on various cards. I buffed the cards to remove any remaining ink so it would not come off on the laces.

Each of the cards was stamped with a vintage sewing object. I then wrapped my lace around the cards and used a pin to keep them in place.

Thanks
for stopping by my blog today.
Don't forget that Gina's Designs is having a sale until March 15, 2014! Please use the code WINTERBLUES15!
Gina's Designs Products
CraftSupplies1
Heart Venice Lace
All Flowers
Metal Circles
Other Products
Gesso: Studio 71 - white
Paper: KellerKurtz & Company (thePaperStudio carried at Hobby Lobby)
Stamp Set: TPC Studio - Vintage Crafting
Inkadinkado - Script
Embossing Powder: Lindy's Stamp Gang - Orbit Olive Gold & Magic Moon Pearls
Stampin' Up! - Clear
Embossing Ink: Ranger - Tinted Embossing Ink (refill)
Ink: Tim Holtz - Walnut Stain, Sage Green
Memories - Black
Ink Refill: Tim Holtz - Tea Dye
Coffee: Foldgers
Lace - from my stash
Leaves - from my stash
Mod Podge
Thursday, March 6, 2014
Gina's Designs DT Project: March Sketch Challenge - Believe
Happy March! This has to mean spring is right around the corner, right? This layout is using the March Sketch Challenge.

As
always, the chipboard pieces are first given a coat of gesso. The
"believe" was inked with black soot distressed ink and then embossed
with Lindy's Stamp Gang Midnight Brown. For the candles, I colored the
flames with yellow and orange markers, embossed the the two end flames
with Iridescent Sparkle and the middle flame with Stampin' Up! - Clear.
The candle is painted white and the holders are embossed with Pirate
Gold and I sprinkled a bit of Gold Tinsel while the embossing was still
hot.
For the ornate side pieces, I took the square-like frame and cut it apart. I used Cocoa, Walnut Stain, Jumbo Java, & Cosmic Copper inks before covering it with Hampton Art embossing powder - Clear. The same technique was used on the leaf pieces except I used Tea Leaves, Jumbo Java, & Hint of Pesto.
Thanks for stopping by today and don't forget to upload your March Sketch Challenge to the gallery for a chance to with $10.00 from Gina's Designs!
Gina's Designs
Other Products Used
markers: Bic
gesso: Studio 71 - white
embossing power: Stampendous - Pirates Gold & Gold Tinsel
Lindy's Stamp Gang - Midnight Brown
Stampin' Up! - Clear
Craft Essentials - Iridescent Sparkle
Hampton Art - Clear
ink: Tim Holtz Distressed - Black Soot, Walnut Stain & Fire Brick
Color Box - Cocoa
Dew Drop - Tea Leaves, Jumbo Java, Hint of Pesto & Cosmic Copper
paper: The Paper Studio (Hobby Lobby) - Faith
velum paper
ribbon: The Crafters Haven - Velvet Ribbon
gesso: Studio 71 - white
embossing power: Stampendous - Pirates Gold & Gold Tinsel
Lindy's Stamp Gang - Midnight Brown
Stampin' Up! - Clear
Craft Essentials - Iridescent Sparkle
Hampton Art - Clear
ink: Tim Holtz Distressed - Black Soot, Walnut Stain & Fire Brick
Color Box - Cocoa
Dew Drop - Tea Leaves, Jumbo Java, Hint of Pesto & Cosmic Copper
paper: The Paper Studio (Hobby Lobby) - Faith
velum paper
ribbon: The Crafters Haven - Velvet Ribbon
Tuesday, February 25, 2014
Gina's Designs DT Project: February Sketch Challenge
Thanks for stopping by my blog today! I have created a 12x12 layout using the February Sketch Challenge and my beautiful niece as inspiration.

The paper is from a K&Company value pack. I first started with gesso on all the chipboard pieces. I then mixed some white acrylic paint with TiffanyLou Blue. After applying a coat of this paint, I blended in a light touch of some of the Brilliant Blue paint. Once the paint had dried, I sprayed all the flourishes first with TiffanyLou Blue and then Blue Hawaiian Blue.


This flourish is stamped with a script stamp from Inkadinkado.

Here is a different view of the print on the flourish. The little butterfly has glitter on it as well.

Thanks again for stopping by. Don't forget about the sale going on at Gina's Designs - 15% off your entire order!
Gina's Designs Products
Other Products
Paper: K&Company Value Pack
Glitter: Martha Stewart: Lapis Lazuli, Aquamarine Crystal, Turquoise, Florentine Gold
Paint: Folk Art:Brilliant Blue & Craft Essentials:White
Feathers
Lindy's Stamp Gang: TiffanyLou Blue, Blue Hawaiian Blue
Metal Butterfly: ButterBeeScraps
Embossing Powder: Ranger:Black
Paper: K&Company Value Pack
Glitter: Martha Stewart: Lapis Lazuli, Aquamarine Crystal, Turquoise, Florentine Gold
Paint: Folk Art:Brilliant Blue & Craft Essentials:White
Feathers
Lindy's Stamp Gang: TiffanyLou Blue, Blue Hawaiian Blue
Metal Butterfly: ButterBeeScraps
Embossing Powder: Ranger:Black

Tuesday, February 18, 2014
Gina's Designs DT Project: Dressform Cork Board
Happy Tuesday!I am pleased to bring you my latest DT project for Gina's Designs. I have made a cork board
to keep track of my DT project due dates. I used the box portion of the
Daily Box SEW since I used a lot of the elements that came with it on my
Couture Shop project. After a good coat of gesso, I actually papered
the inside and outside sides with Couture Shop by Graphic 45.

And then I changed directions! I
covered the sides with lace and trim from my stash. On the inside, I
covered it with a piece of cork board and then some rosette lace I got
from Suhafuha on Zibbet.


I
used gesso on all the dressform pieces and colored them with marker
before applying clear embossing powder to the miniature ones. I attached
five of the mini dressforms to thumb tacks I had.

The
larger dressform (which is designed to be free standing) is covered
with a piece of paper from the Couture Shop.

On the larger dressform, I
attached a mini cork board that I made from one of the frames that was in
a "thank you for order" from Gina. I attached one of the miniature dressforms to it.

The bottom of the large dressform is a flower cluster I made. Not only is it darling, but the cluster also hides the slit where the cross piece slides in to make the dressform stand on its own.
Thank you for stopping by my blog today! Don't forget about the sale going on at Gina's Designs right now - 15% off your entire purchase through March 15, 20014!
And YES!
Gina ships ALL products internationally!
And YES!
Gina ships ALL products internationally!
Gina's Designs
Frame - thank you gift for past order
Other Supplies
Lace: CraftSupplies1, Suhafuha, My Stash
Flowers: Lavish Laces, CraftSuplies1
Markers
Clear Embossing Powder
Cork Board
Loose Pearls
Pearl Trims: CraftSupplies1
Paper: Couture Shop by Graphic 45
Sunday, February 16, 2014
Beat the Winter Blues Sale at Gina's Designs Laser-cuts!
Are
you having the winter blues? Bored and tired of winter? Why not
brighten up your crafty space with some gorgeous goodies from Gina's Designs Laser-cuts!
We are having a Winter Blues Sale going on right now!! 15% off your ENTIRE Order!! Just enter the coupon code WINTERBLUES15 to get your discount!
Remember we are having our BIG cross promotion with Craftsupplies1 starting March 1st, so this is just in time to give you some savings to craft along with us in March. Don't miss out!
Remember: WINTERBLUES15 Code is good until March 15, 2014!
We are having a Winter Blues Sale going on right now!! 15% off your ENTIRE Order!! Just enter the coupon code WINTERBLUES15 to get your discount!
Remember we are having our BIG cross promotion with Craftsupplies1 starting March 1st, so this is just in time to give you some savings to craft along with us in March. Don't miss out!
Remember: WINTERBLUES15 Code is good until March 15, 2014!

Tuesday, February 11, 2014
Gina's Designs DT Project: Cat Mask
Thanks for stopping by the blog today! For the month of February, all the designers on Gina's team needed to create a mask using one of the four great designs from her Masks Shapes Set. Mine morphed into a steampunk kitty! I know! I don't do steampunk! This was my first attempt at it.

The mask I decided to use is the one in the top right corner.

As always, I start with a coat of gesso. Next, I cut different size squares of the 3M foil tape. I then place the squares over the surface of the mask. Using a stylus, I simply made an impression in the foil to give a rivet look. I then took one of the steampunk hearts, bent it a bit, covered with the foil tape and attached to the mask.
 |
| I covered the mask with black acrylic paint, let it dry for a bit then gently wiped off. I did this several times until I was happy with the results. The clock hands were gessoed and the sprayed with Lindy's. When they were dried, I brushed a thin layer of red metallic paint over them. |

The gear boarder and corners were gessoed, sprayed with Lindy's, then embossed with silver and black soot. I then took an emery board over the top of some of the gears to give it more of a distressed look. I then sprayed them again with Lindy's. The swirl patter is simply colored by a bic marker in black.
After attaching all the gears and boarders to the mask, I finished it off with metal gears, a clock face, feathers and flat back pearls.
Thanks for stopping by the blog today! I have a list of all the products below. For Gina's products, just click on the name below and it will take you directly to that product in her store.
Have a great week!
Gina's Designs
Masks Shape Set
Steampunk Hearts
Clock Hands Shape Set
Gears Borders & Corners Shape Set
Gears Shape Set
Other Products
Gesso
Paint: Black and Red Metallic
Lindy's Stamp Gang:: Whale Watch Blue & Black Orchid Silver
Metal Gears: Tim Holtz & ButterBeeScraps
Metal Clock: Tim Holtz
Flat Back Pearls: Joann Fabrics
Black Bic Marker
3M Foil Tape
Feathers - Stash (they were my dad's, he made his own fishing lures)
Embossing Power: Silver - Stampin' up! Black Soot Distressed- Tim Holtz
After attaching all the gears and boarders to the mask, I finished it off with metal gears, a clock face, feathers and flat back pearls.
Thanks for stopping by the blog today! I have a list of all the products below. For Gina's products, just click on the name below and it will take you directly to that product in her store.
Have a great week!
Gina's Designs
Masks Shape Set
Steampunk Hearts
Clock Hands Shape Set
Gears Borders & Corners Shape Set
Gears Shape Set
Other Products
Gesso
Paint: Black and Red Metallic
Lindy's Stamp Gang:: Whale Watch Blue & Black Orchid Silver
Metal Gears: Tim Holtz & ButterBeeScraps
Metal Clock: Tim Holtz
Flat Back Pearls: Joann Fabrics
Black Bic Marker
3M Foil Tape
Feathers - Stash (they were my dad's, he made his own fishing lures)
Embossing Power: Silver - Stampin' up! Black Soot Distressed- Tim Holtz
Tuesday, February 4, 2014
Gina's Designs DT Project: Five-Drawer Storage Cabinet
Where the heck has January gone? I cannot believe it is February already! Today I have this amazing five-drawer storage unit!
 I love this unit! The drawers are nice and deep and you can hold a lot in each one!
This unit goes together quickly! I papered the front of the drawers, top and sides with Kellerkurtz & Company (I think right now it is my favorite paper stack!) Before gluing the paper down, I did distress the edges with Walnut Stain. I adhered the metal filigrees with E-6000 and then applied the handles over the top.
 In the top left corner I have one of the doilies which I distressed with the Walnut Stain.
This is a great storage unit that you will have able to have completed in a few short hours.
Thanks for stopping by the blog today! See you next week!
Gina's Designs
This unit goes together quickly! I papered the front of the drawers, top and sides with Kellerkurtz & Company (I think right now it is my favorite paper stack!) Before gluing the paper down, I did distress the edges with Walnut Stain. I adhered the metal filigrees with E-6000 and then applied the handles over the top.
This is a great storage unit that you will have able to have completed in a few short hours.
Thanks for stopping by the blog today! See you next week!

Other Products
Paper: KellerKurtz & Company (thePaperStudio carried at Hobby Lobby)
Metal Handles: ButterBeeScraps
Metal Filigree: Craft Supplies 1
Ink: Tim Holtz - Walnut Stain
Glue: E-6000, Aleene's Tacky Glue
Paper: KellerKurtz & Company (thePaperStudio carried at Hobby Lobby)
Metal Handles: ButterBeeScraps
Metal Filigree: Craft Supplies 1
Ink: Tim Holtz - Walnut Stain
Glue: E-6000, Aleene's Tacky Glue
Wednesday, January 29, 2014
Gina's Designs DT Project: Dog Bone Mini Album
Hello everyone! Today I have or you one of Gina's Dog Bone Mini Albums featuring my dog, Molly. The album contains six bone shapes to use for the covers and pages

The first thing I did was gesso all the bones. After that I covered each of the bones with paper from The Pets Stack by DCWV and inked all the edges.On the cover, I embossed a chipboard frame with Lindy's Madonna Rube Blue Gold. I put two metal pieces from ButterBeeScraps on both sides of the frame. The metal letters spelling out "Molly" were from my stash. The letters were on top of paperclips and I easily broke them off and attached them to the frame with E-6000. The picture in the frame was from the first day home.
I attached the album with a ring and tied some different ribbons on it.


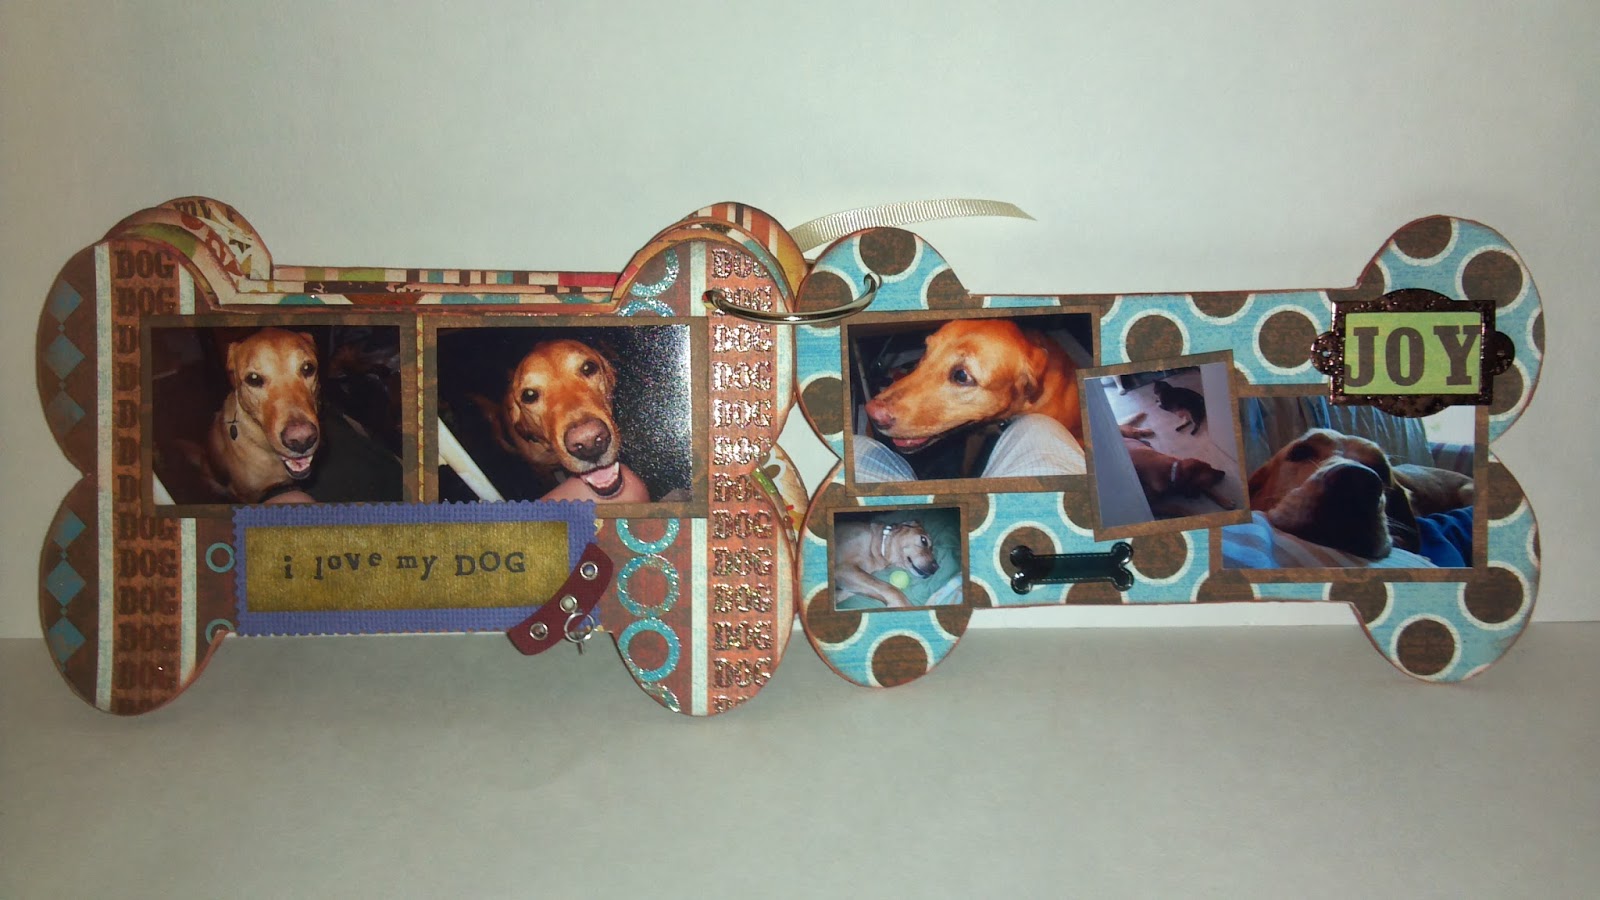


. I used another miniature bookplate and the word "joy" on page ten.
The back cover is just plain and I used the same paper as I have on the cover.
The back cover is just plain and I used the same paper as I have on the cover.
There you have it! I wanted a simple book to reflect how she is - simple! She is not high maintenance and is such a good dog! She has been visiting grandma the last few months and I can't wait to go pick her up!
Thanks for stopping by my blog today! I have all the links to Gina's products below plus a list of the other products used.
Gina's Designs
Other Products Used
Bling: Me & My Big Ideas
Metal Filigree: ButterBeeScraps
Embossing Powder: Lindy's: Madonna Rube Blue Gold, Midnight Bronze
Metal Letters: from stash
Paper: DCWV - the Pets Stack
Stickers: Elevations: Doggy Elevations
Jolee's Boutique: Spoiled
Life's Little Occasions: Pet Firsts Dog
EK Sucess: Epoxy Dog Phrase
Glue: E-6000, Aleene's Tacky Glue, ATG
Ink: Tim Holtz-Walnut Stain, Color Box - Brown, Stazon - Black
Ribbon: Stash
Glue: E-6000, Aleene's Tacky Glue, ATG
Ink: Tim Holtz-Walnut Stain, Color Box - Brown, Stazon - Black
Ribbon: Stash
Subscribe to:
Posts (Atom)